During the stripdown of the Kawasaki I have noticed that most of the rubber parts on the bike have hardened and some have even started to crack.
Now normally I would just buy or make some new ones but the idea of this blog is to try and do as much as possible for free.
So with this in mind I have decided to try and restore the original parts without buying any special products and just use what I have lying around.
There are many different ideas floating around the net on how to restore rubber but the one I have decided on is soaking them in brake fluid.
There were two main reasons for this decision, firstly I had some old brake fluid lying around that I was going to depose of anyway so it would be free to do and secondly it required very little work, just drop the part in some brake fluid and wait.
So I will try this in the next few days and post the results good or bad.
Tuesday, 30 July 2013
Saturday, 27 July 2013
Fuel tank removal page now complete
Just finished the page showing step by step removal of the fuel tank so I suppose the next page is going to be the stripping of the ancillaries from the tank and de-rusting ready for paint.
Wednesday, 24 July 2013
Dodgy Fuel Tank And Not Giving In
Now the whole point of doing this rebuild is that I want to spend as little as possible doing it. Anyone can build anything they want if they throw enough money at it ( or throw enough money at someone else to build it for them !).
Ideally I would be able to do everything without spending any money at all but I know that for safety reasons or just common sense I will have to spend some money but I intended to use my own and hopefully your ingenuity and skills to reuse and repair the existing bike parts as much as possible.
This all sounded like a good idea at the time but one of the first things to come off the bike was the tank.
it looked ok from the outside, a little surface rust but not to bad.
Then I decided to open the fuel cap and look inside.
Two hours and much swearing later the fuel cap eventually came of, it had rusted itself shut and the inside of the tank is completely rusty and full of water.
 |
| Pretty nasty rust inside the tank At least it does not leak |
Now normally I would just scrap it and buy a new one but that's not the point of this project so I need to try and salvage this one and this is unfamiliar territory for me.
Cutting and reshaping, painting and stuff like that is no problem with the correct tools and equipment but rust well
I JUST DONT DO RUST.
I could cheat and buy a new one and just say it was fine all along but I am doing this as a challenge to myself and will be honest all the way through and anyway I do not give in that easily
So even this early in the project I am looking for ideas on how to de-rust and restore the inside of the fuel tank preferably for free or at least at very little cost and everything needs to be able to be done at home without specialist tools.
I will let you know what I decide to do and how it turns out in later posts but if any one has any ideas please let me know and I will chose one to try.
Sunday, 14 July 2013
Removing the fuel tank, Yes I have actually done something
I have actually done something !
So this is how I did It
Remove the seat by unlocking with the key and lifting it off, then remove the side panels, these are just held on by rubber grommets and just pull off.
You can then disconnect the battery, Sparks and fuel are not a good combination !
Then undo the two bolts on the back of the tank.

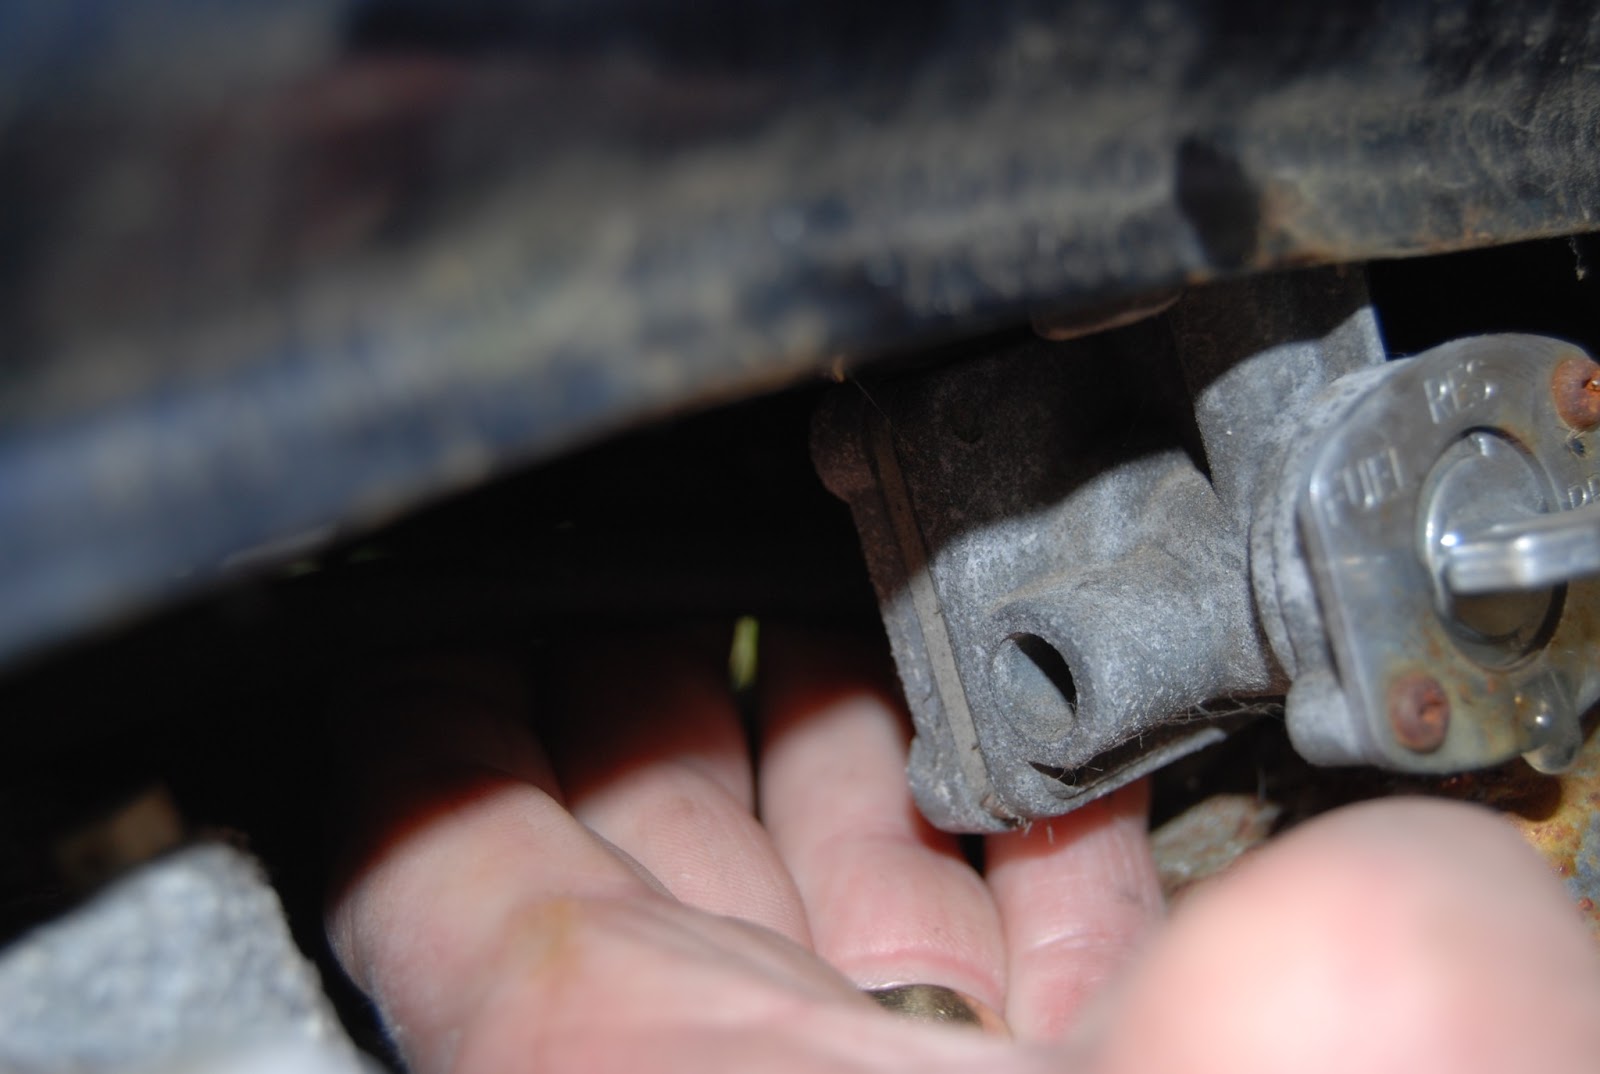
Under the left hand side of the tank pull off the two pipes attached to the fuel tap. The main fuel line to the carbs is on the right of the fuel tap as you look at it and the vacuum pipe at the rear of the tap
Then on the right of the tank disconnect the fuel sender gauge block connector, You can see it in the picture below just resting on top of the carb.
There are also two breather pipes under the right hand side of the tank, one from the fuel sender unit and one from the rear of the tank. You can leave these on the tank if you wish ( I did ) just note were these are routed as you will need to re route them in the same place on reassembly.
Its then just a case of lifting the rear of the tank and easing it towards the back of the bike to slide it off the two rubber locating lugs at the front of the tank. If you have left the breather pipes on then these just need to be eased out too.
Remember work safely and carefully and make sure you take note of any health and safety regulations at all times.
The sun is out and after going out for the day I have spent an hour on the bike. I know it my not sound very much but I have now got the seat and tank of and it feels like a project bike and not a pile of scrap.
So this is how I did It
Remove the seat by unlocking with the key and lifting it off, then remove the side panels, these are just held on by rubber grommets and just pull off.
You can then disconnect the battery, Sparks and fuel are not a good combination !
Then undo the two bolts on the back of the tank.
Under the left hand side of the tank pull off the two pipes attached to the fuel tap. The main fuel line to the carbs is on the right of the fuel tap as you look at it and the vacuum pipe at the rear of the tap
 |
| The main fuel line to the carbs just pulls off |
 |
| And so does the vacuum pipe at the rear of the tap |
Then on the right of the tank disconnect the fuel sender gauge block connector, You can see it in the picture below just resting on top of the carb.
 |
| Fuel gauge sender connector just pulls apart |
There are also two breather pipes under the right hand side of the tank, one from the fuel sender unit and one from the rear of the tank. You can leave these on the tank if you wish ( I did ) just note were these are routed as you will need to re route them in the same place on reassembly.
 |
| Breather pipe from fuel gauge sender runs under tank |
 |
| Then runs parallel with the breather pipe from the rear of the tank down between the frame and the battery box |
 |
| On this bike they were cable tied to the rear brake master cylinder |
 |
| Then they run down through two loops on the swingarm |
Its then just a case of lifting the rear of the tank and easing it towards the back of the bike to slide it off the two rubber locating lugs at the front of the tank. If you have left the breather pipes on then these just need to be eased out too.
And that's it the tank is off !
 |
| The underside of the tank showing the various parts underneath At the bottom ( right hand side of tank ) is the fuel sender unit with the electrical connector and breather attached and the other breather pipe at the rear. At the top ( left hand side ) is the fuel tap showing the two pipe connectors. |
Refitting is just the reverse of removal,
I will show the restoration of the tank and bodywork in a later post and show the refitting when I finally resemble the bike .
Remember work safely and carefully and make sure you take note of any health and safety regulations at all times.
Thursday, 11 July 2013
Rain stops play !
Rain Stops Play !
My decision to try and do this rebuild at home seemed simple enough.
I wanted to work on a bike like I did as a teenager, outside in the garden
with just the basic tools I had at the time and usually with no money either.
- I knew I would not be able to use all my tools and equipment as they are at my workshop out of town.
- I knew I would be spending as little as I could get away with, just to see how much could be done on a very small budget.
- I knew that only working on the bike in my spare time after work would mean it wont get done in a few weeks, its going to be more like 5 months
- I knew that working on parts inside my home ( I do not have a workshop at home ) would not please my wife !
but that was going to be the point of this challenge and I was going to be quite strict on myself and follow the rules I set above and I have decided to do this blog partly as a way of enforcing those rules as that way you are watching me and will hopefully encourage me and keep me true to these rules.
BUT...................
I forgot about the BLOODY RAIN !
I expected to have the bike completely striped into its major components by now but it has rained every night since I decided to do this.
So as soon as its dry I will start but for now its just sitting there getting even more rusty.
Tuesday, 9 July 2013
What have I done ........
Getting Motivated
Today I came home from work and took a look at the bike sitting outside in the sunshine.
I thought "bloody hell what am I going to do?"
Technically this bike is barely suitable for spares and I would not even entertain attempting to touch it under normal circumstances as it is not worth anything now and it wont be worth much even if I do get it looking good because its not exactly a sought after classic.
But then that is not the point, The point of this exercise is to see what I can do with no money and basic equipment to save this bike from the scrap yard.
It would be fairly easy to do something with it if I was prepared to take it to the workshop and throw some money at it as I normally would but this is going to be my challenge to myself, my attempt to do something the hard way, something to make me think !
So I will get on with the strip down and post my thoughts and progress as often as possible.
Sunday, 7 July 2013
My Youtube Chanel
Well I decided to set up a youtube channel and add videos of the project so not only can check out the photos on this blog but I will add links to the videos as well. Hopefully you will enjoy the videos too.
This is the first one I have added to youtube as an experiment more than anything else and it just shows a walk-around of the bike as it was when I started, ( I have never posted a video before so this was really just to test how it works ).
Well here it is
Like I said this one is just a walk-around of the bike and if you have any suggestions for improving my videos please comment and let me know.
Thursday, 4 July 2013
The beginning, a scrap motorcycle, no money and very little time
 |
| The bike I started With |
 |
| I would like to end up with something like this ! |
I know it had to be done but not having a bike for the first time ever in my adult life is surprisingly depressing and I decided that I must get back on two wheels somehow.
Now I said I do not have a bike but that is not strictly true, I do have a bike an old Kawasaki Zephyr 750 that used to be my winter hack.
Now this bike was a bit of a wreck when I had it on the road but now having sat unused and untouched at the bottom of my garden for 6 years it is basically scrap metal and is probably worth less than £100.
Now I have decided this is probably my only chance to get back on the road. it is an absolute wreck but it did run before I abandoned it even if it was a little rattly from the cam chain and a bit of piston slap was evident when cold.
So this blog is going to chart my progress as it happens and I will add pages to the side bar on the right listing each section of the project such as frame, engine rebuild etc with step by step instructions on how I did it.
I will also have a page on costs of the project and a total expenditure for parts etc.
Feel free to comment on my methods and whether you agree or disagree on how I have done it or give any advice you may have to help, I dont mind anyone giving their opinion good or bad just try and be polite !
Remember this project is going to have to be done for virtually no money, obviously some items will have to be bought for safety reasons but I will be trying to find ways of improving what I have not replacing things that can be modified or repaired by me.
Subscribe to:
Comments (Atom)